
MENU
|
Oil Temperature Gauge Fitting Guide
When I rebuilt my engine I decided to fit an oil cooler to cope with the additional heat generated by the higher power output, especially during track use. But what good is an oil cooler if you don't know what the oil temperature is?
 So I decided to fit an oil temperature gauge, but I didn't really like any of the aftermarket solutions. I didn't fancy the extra wiring, mismatched dials and in particular I didn't like the price. My solution was to reuse as much of the existing wiring as possible and to retain the original dash instruments. I had read that the oil filter housing would accept a standard "blue" coolant temperature sender without modification. This meant that I could use the Stack's coolant display to toggle between coolant and oil temperature.
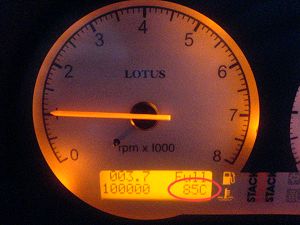
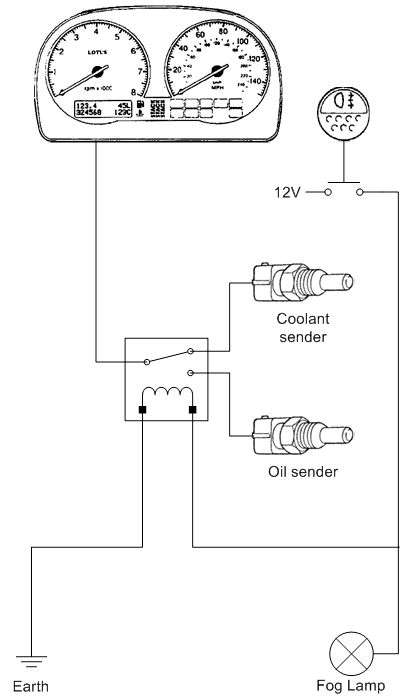
My method of switching between coolant and oil temperature is to hijack the fog lamp! By splicing into the fog lamp wiring it's easy to use an electrical relay to do the switching. This way all the wiring is kept within the engine bay... and the fog lamp still works! The Stack displays coolant temperature as normal but when the fog lamp is illuminated then the oil temperature is displayed.
Initially I was reticent about using the fog lamp switch in this way - I didn't want to appear to be flashing my fog lamp randomly - but in reality you don't often check oil temp. It's a good way of keeping wiring work to a minimum and there's little risk of accidentally leaving the oil temp being displayed.
So if you want to do the same then read on...
Parts required:
- Normal oil change parts (oil, filter, sump plug washer)
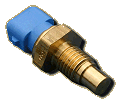
- Temperature sender (example)

- 2x Temp sender connector (example)
- Sump plug washer for temp sender
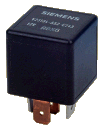
- Automotive relay (example 1, example 2, more info on relays)
- Electrical spade connectors (unless your relay comes with a base)
- 10A electric wire (2-3 metres, different colours is useful)

- Quick splice terminal (example)
- Cable ties
- Electrical tape
- Optional:
- Oil filter housing gasket
Tools required:
- 5mm allen socket
- 19mm spanner
- Crimps/wire stripper/pliers
- Optional:
- 8mm spanner/socket wrench
- Flat file
- Bench vice or G-clamp
- Small torque wrench
Instructions
- Raise the car and remove the engine undertray.
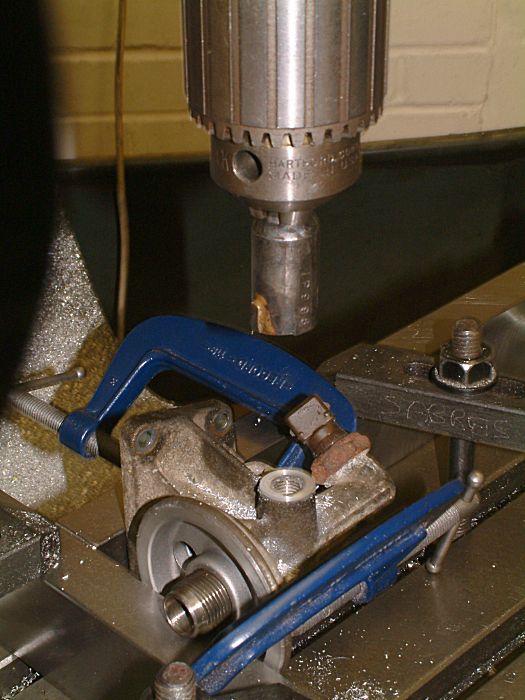
- Drain the engine oil and remove oil filter
| |
| Option 1 (quick and dirty) | Option 2 (the "proper" way) |
|---|---|
|
|
- Fit new oil filter and refill engine oil
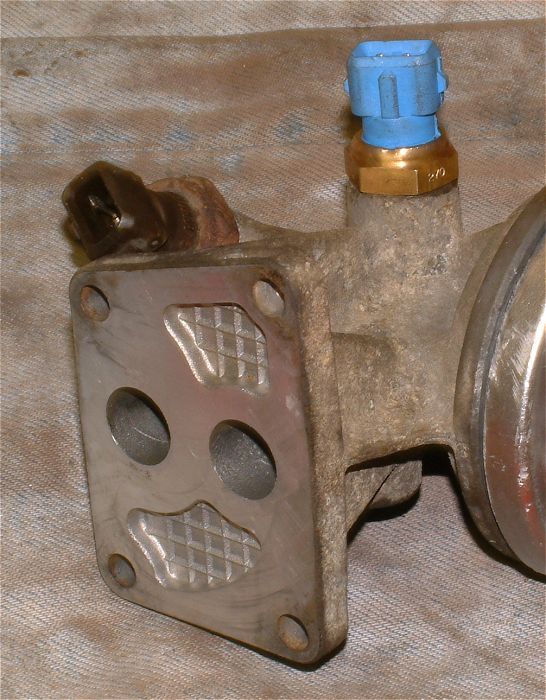
Fill the engine with oil as normal. Run the engine and check the filter housing for leaks. - Rewire the coolant temperature sender
Cut off the old connector from the coolant temperature sender and free up that length of wire. The amount of free wire that you are left with will determine where you can position the relay. But you can of course extend the wire if you have a specific location in mind. Now take a new length of wire and connect it to a new connector. Connect that to the coolant temperature sender.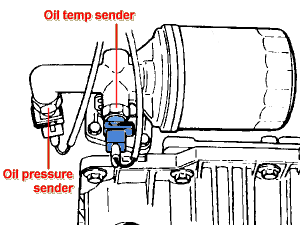
- Wire up the oil temperature sender
Unplug the coolant temperature sender and make a note of which of the two terminals is wired up. Take a new length of wire and connect it to a new sender connector. Connect that to the oil temperature sender. If the wire is to pass close to the engine or exhaust then use a heat sleeve. - Splice into the fog lamp wiring
The easiest way to locate the positive wire for the fog lamp is to examine the wiring block in the left hand side of the boot. There are two bullet connectors, one for the fog lamp and one for the reversing lamp. Turn on the fog lamp and disconnect both bullet connectors in turn to identify which is for the fog lamp. Now use a quick splice terminal to run a new length of wire from the fog lamp live into the engine bay. - Wire an earth connection
This is the last wire. There is an earth strap between gearbox and chassis but anywhere on the gearbox makes a good earth.
- Wire up the relay
Having decided where you want to position the relay (I attached mine to the coolant rail), bring all four wires into that position. Trim the wires to the correct length and fit spade connectors (or relay base if you have one). Connect the wires to the relay as per the circuit diagram, ensuring that the coolant temp sender is connected to the "normally open" terminal. - Test everything!
Make sure that the coolant temperature operates as normal. Turn on the fog lamp and make sure that it still illuminates. With the fog lamp on, disconnect and reconnect the associated relay connection and listen for the relay clicking as it switches between terminals. With the engine up to normal operating temperature watch the Stack temperature display as you operate the fog lamp switch. If all is well then insulate the relay terminals with electrical tape and secure the relay in position. Don't forget to refit the undertray lower the car ;-) - Go for a drive!
Now find out how long it takes to get the oil up to operating temperature (80-85°C) and just how hot it gets during a long fast motorway blast. You may be surprised!
|
© 19-Jan-2007 |